
The Complete Ergonomic Home Office Setup Guide (2026)
A proper ergonomic home office setup is the difference between ending your workday feeling fine and ending it with a stiff neck, aching back, and tired eyes. This guide walks you through every zone of your workspace — chair, desk, monitor, keyboard, lighting, and accessories — with specific measurements, product recommendations, and a printable checklist.
Why Your Ergonomic Home Office Setup Matters More Than You Think
When you commute to a corporate office, someone else has already thought about your workspace. The desk is a standard height, the chair adjusts, and there is usually an IT team that will hand you a monitor arm if you ask nicely. At home, most people start with whatever flat surface is available — a kitchen table, a couch cushion, a stack of books under a laptop — and then wonder why their neck hurts by Thursday.
Poor ergonomics do not announce themselves with a single dramatic injury. They accumulate. A slightly-too-low monitor trains your neck to tilt forward a few degrees. A chair without lumbar support lets your lower back round hour after hour. Over weeks and months, these small misalignments turn into chronic pain, reduced focus, and even repetitive strain injuries that can take years to fully resolve. The good news is that building an ergonomic home office setup does not require a massive budget or an engineering degree.
It requires understanding a handful of principles — neutral posture, proper screen distance, and adequate support — and then choosing equipment that makes those principles easy to maintain all day long. Bookmark this guide, because you will likely revisit individual sections as you upgrade your office over time.
The Foundation: Your Chair
Your chair is the single most important purchase in any ergonomic home office setup. You will spend more continuous hours in contact with it than any other piece of equipment, and its quality directly determines your spinal alignment, hip comfort, and circulation.
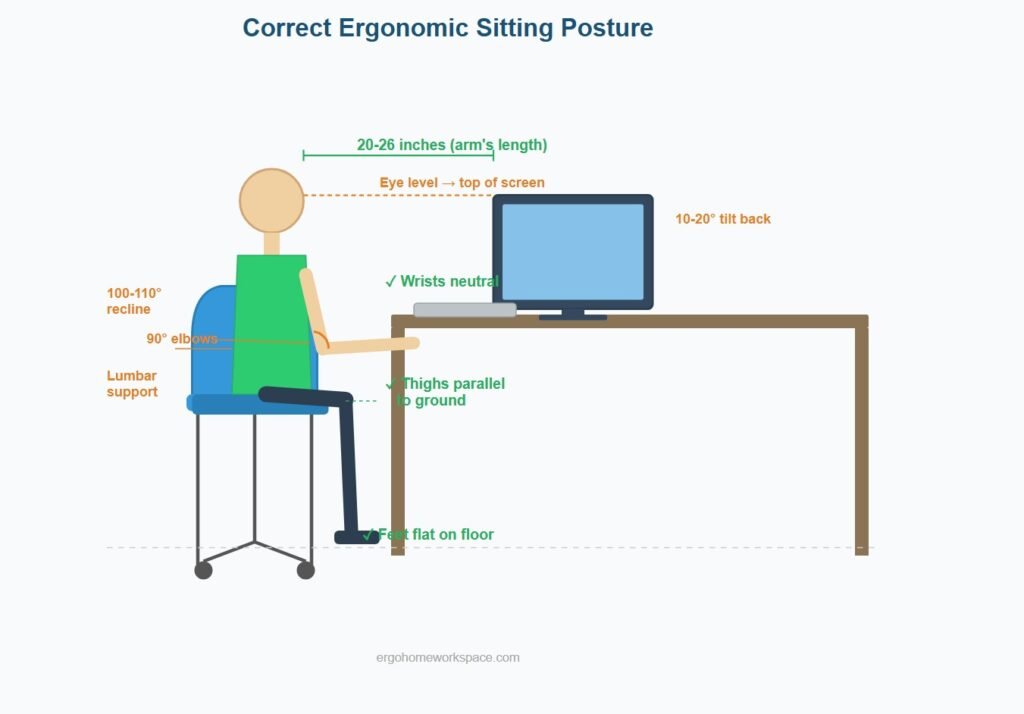
A good ergonomic chair should offer adjustable seat height so your feet rest flat on the floor with thighs parallel to the ground. It should have adjustable lumbar support that fills the natural curve of your lower back without pushing you forward. Armrests should be height-adjustable so your forearms rest at roughly 90 degrees when typing, and the seat pan should be deep enough to support your thighs without pressing into the backs of your knees.
Budget pick: The HON Ignition 2.0 offers solid adjustability at around $399 and is a favorite among ergonomic consultants for home offices. It features a breathable mesh back, adjustable lumbar, height-and-width adjustable arms, and a synchro-tilt mechanism. Mid-range pick: The Autonomous ErgoChair Pro provides full mesh design with extensive adjustability — regularly priced around $499-599. Premium pick: The Steelcase Leap V2 remains the gold standard for all-day sitting — expect to pay around $1,000-1,200 new or $400-600 refurbished.
If your budget is truly tight, even a $30 lumbar support cushion strapped to your current chair can make a meaningful difference while you save up for a proper upgrade.
Desk Height and Standing Options
Your desk height determines your arm position, which in turn affects your shoulders, wrists, and neck. The standard desk height of 29 to 30 inches works reasonably well for people between 5’8″ and 5’10”, but it is too tall for shorter people and too short for taller ones.
The ideal typing surface puts your elbows at 90 degrees with your forearms parallel to the floor and your wrists in a neutral (not bent) position. If your desk is too high, you shrug your shoulders to compensate, creating tension. If it is too low, you hunch forward. According to Cornell University’s Ergonomics Web, maintaining neutral joint positions is the foundation of any healthy workspace.
A sit-stand desk solves the height problem and adds the health benefit of alternating between sitting and standing throughout the day. Research suggests that switching positions every 30 to 60 minutes reduces lower back discomfort and improves alertness. You do not need to stand for hours — even 10 to 15 minutes of standing per hour makes a difference.
If a full standing desk is not in your budget, a standing desk converter sits on top of your existing desk and raises your monitor and keyboard to standing height. The FlexiSpot M7B and the VIVO 32-inch converter are both solid options under $200.
Monitor Placement: The 20-20-20 Rule
Monitor placement is where most home offices fail — and where a proper ergonomic home office setup makes the biggest visible difference. Laptops are the worst offenders because the screen and keyboard are attached, forcing you to either look down (straining your neck) or type with raised arms (straining your shoulders). The solution is simple: use an external monitor, or at minimum, a laptop stand paired with an external keyboard.
The top of your monitor screen should be at or slightly below eye level. The screen should sit approximately an arm’s length away — roughly 20 to 26 inches from your eyes. Tilt the monitor back 10 to 20 degrees so you look at it with a slight downward gaze rather than straight on.
If you use dual monitors, the primary monitor goes directly in front of you and the secondary monitor sits at an angle to its side. If you use both monitors equally, center the seam between them in front of your nose and angle both slightly inward.
A monitor arm is one of the most underrated ergonomic upgrades. It frees up desk space, allows precise height and tilt adjustments, and makes it easy to reposition your screen throughout the day. The Amazon Basics Monitor Arm and the VIVO Single Monitor Desk Mount are reliable options under $40.
Do not forget the 20-20-20 rule for eye strain: every 20 minutes, look at something 20 feet away for 20 seconds. It sounds trivial, but it significantly reduces digital eye fatigue over a full workday.
Keyboard and Mouse Ergonomics
Standard flat keyboards force your wrists into pronation — palms facing down, wrists slightly bent outward. Over time, this position compresses the carpal tunnel and contributes to wrist pain, numbness, and tingling.
An ergonomic keyboard addresses this by splitting the key layout and tenting the halves so your wrists stay in a more natural, neutral position. The Logitech Ergo K860 is the most popular entry point — it has a curved, split layout with a built-in wrist rest and costs around $130-150. For a fully split option, the Kinesis Freestyle2 lets you position each half independently.
Your mouse matters equally. A vertical mouse keeps your forearm in a handshake position rather than a flat, pronated one. The Logitech MX Vertical (around $80-120) and the Anker Ergonomic Vertical Mouse (around $20-25) are the two most recommended options.
Position your keyboard so your elbows stay at 90 degrees and your wrists float in a neutral position. If you use a wrist rest, rest your palms on it between typing bursts — do not press your wrists into it while actively typing, as this creates pressure on the carpal tunnel.
Lighting That Protects Your Eyes
Poor lighting causes eye strain, headaches, and fatigue faster than almost any other environmental factor. The two biggest mistakes in home office lighting are relying solely on overhead room lights (which create glare on your screen) and working in a dim room with a bright monitor (which forces your pupils to constantly adjust).
The goal is balanced, layered lighting. Your ambient room light should be roughly the same brightness as your monitor. Add a task light — a desk lamp with adjustable brightness — positioned to the side of your monitor so it illuminates your desk and documents without reflecting off the screen.
Look for a desk lamp with adjustable color temperature. Cooler light (5000K-6500K) supports alertness during focused work, while warmer light (2700K-3000K) is easier on the eyes during evening hours. The BenQ ScreenBar clips to the top of your monitor and lights your desk without glare — it is specifically designed for this purpose and costs around $110.
If you work near a window, position your desk so the window is to your side rather than directly behind or in front of your monitor. A window behind your monitor creates glare; a window behind you creates a reflection on the screen.
Accessories That Complete Your Ergonomic Home Office Setup
A footrest solves the common problem of chairs that are adjusted for proper arm height but leave your feet dangling. The ErgoFoam Adjustable Foot Rest is a popular choice under $35.
A document holder positions reference papers at the same height and distance as your monitor, eliminating the neck-twisting motion of looking down at papers on your desk and then back up at your screen.
Cable management might seem cosmetic, but a cluttered desk creates visual stress and makes it harder to adjust your equipment positions. A simple cable tray under your desk and a few velcro ties can transform a tangled mess into a clean workspace in under 30 minutes.
The Ergonomic Setup Checklist
Use this quick-reference checklist to audit your ergonomic home office setup. Go through each item and adjust as needed:
Chair: Feet flat on floor, thighs parallel to ground, back supported by lumbar cushion or chair back, armrests at elbow height.
Desk: Typing surface allows 90-degree elbow angle, wrists neutral and not bent up or down, enough depth for monitor distance.
Monitor: Top of screen at or slightly below eye level, screen approximately one arm’s length away, tilted back 10 to 20 degrees, no glare from windows or overhead lights.
Keyboard and mouse: Keyboard centered in front of you (not offset), wrists floating in neutral position, mouse at the same height as keyboard and within easy reach.
Lighting: Room ambient light roughly matches screen brightness, task light illuminates desk without screen glare, window to the side if possible.
Movement: Standing or walking break every 30 to 60 minutes, 20-20-20 rule for eyes, stretch routine at least twice during the workday.
Want a printable version? Download our free Ergonomic Home Office Setup Checklist PDF — it includes this checklist plus budget build guides and product recommendations.
What to Buy First (Priority Order)
If you cannot upgrade everything at once, prioritize in this order. First, your chair — it has the single biggest impact on daily comfort and spinal health. Second, an external monitor or laptop stand plus external keyboard — getting the screen to the right height eliminates neck strain. Third, a proper desk lamp for lighting. Fourth, a standing desk or converter. Fifth, ergonomic keyboard and mouse.
You can build a solid ergonomic home office for under $500 if you shop smart — a refurbished Steelcase or Herman Miller chair ($300-500), a laptop stand ($25), an external keyboard ($30), and a desk lamp ($40). Add a standing desk converter and ergonomic peripherals when your budget allows.
The most important thing is to start. Even one or two adjustments today — raising your monitor, adding a lumbar cushion, improving your lighting — will make a noticeable difference by the end of the week. Ergonomics is not about perfection; it is about consistently reducing strain across every hour you spend working.